How to Make AI-Generated Art Using Python (Example)
Hi! In this tutorial, we will learn how to create AI-generated art using the Hugging Face diffusers library in the Python programming language.
Here is an overview:
Let’s get started!
What is AI-Generated Art?
AI-generated art refers to artworks created using artificial intelligence systems.
By training algorithms and models on vast collections of existing art, AI can learn patterns, styles, and structures to generate new visual or auditory content.
Techniques like generative adversarial networks (GANs) enable AI to create original compositions or mimic specific artists or art movements.
AI-generated art represents the fusion of technology and creativity, expanding the possibilities of artistic expression. It can produce paintings, sculptures, music, poetry, and even virtual reality experiences.
This form of art raises questions about the role of human creativity, the concept of authorship, and the relationship between humans and machines in the artistic process.
While some view AI as a tool that enhances human creativity and offers fresh sources of inspiration, others express concerns about the potential devaluation of human artistic skills and the loss of human touch.
Nonetheless, AI-generated art continues to evolve and captivate artists, researchers, and the general public, pushing the boundaries of what is achievable in the realm of art.
Now that we have some understanding of what AI-generated art is, let us demonstrate how we can use a text-to-image AI model to generate art.
First, though, we need a computer that has a GPU to be able to run the text-to-image code in this tutorial.
GPU Powered Python Programming IDE
A regular CPU computer might not be powerful enough to download and run the text-to-image model in order to generate an image.
If your computer has a GPU, then your Python programming IDE should be able to run the code. Otherwise, an easy and free-to-use IDE that gives you access to a free GPU is Google’s Colaboratory IDE.
To use the IDE, go to the Colab website, then go to “File” in the menu tab above, and then click on “New notebook”.
That will launch a new interactive notebook similar to a Jupyter notebook with code cells that can be run. You can give the notebook a title if you like.
Next, go to “Runtime” and select “Change runtime type”. Click the dropdown under “Hardware accelerator” and select “GPU”, then click “Save”.
Now, you have access to a GPU-powered Python programming IDE that has 12GB of RAM and 78GB of disk space.
Let us now install the necessary libraries.
Install & Import diffusers Library
The main library we need for this project is the Hugging Face diffusers library.
Therefore, run the code below in the code cell of your notebook to install it by either pressing the play button on the left of the cell or hitting “CTRL + Enter”:
!pip install diffusersYou will notice the exclamation mark (!) preceding “pip” in the code above. That is a bash command allows you to run shell commands directly from the notebook cell.
We will also need to install other dependency libraries, namely transformers and accelerate:
!pip install transformers accelerateNext, from diffusers, we will import StableDiffusionPipeline. Then, from PIL we will import Image. We will also import the torch library as well.
from diffusers import StableDiffusionPipeline
from PIL import Image
import torch
Great! Let us now build the pipeline through which we will download and run the text-to-image model.
Build Text-To-Image Pipeline & Generate Image
Create another code cell by hitting “ALT + Enter”, then run the code below:
model_id = "dreamlike-art/dreamlike-diffusion-1.0"

pipe = StableDiffusionPipeline.from_pretrained(model_id, torch_dtype=torch.float16)

pipe = pipe.to("cuda")
Here, we first defined the text-to-image model we want to use, which is dreamlike-art/dreamlike-diffusion-1.0 model. We stored it in the variable model_id.
Next, we built the pipeline using from_pretrained() method through which we were able to download the pre-trained model, which is about 2.13GB in size.
In that method, we tried to conserve processing memory by parsing the half-precision floating-point numbers torch.float16 to the torch_dtype = argument because the model is quite large.
Piping to CUDA expands the compute capability of the GPU so that it can process data faster, which means successfully downloading the model.
Having built the pipeline, we will now generate an image by giving the model a prompt.
In another code cell, run the following:
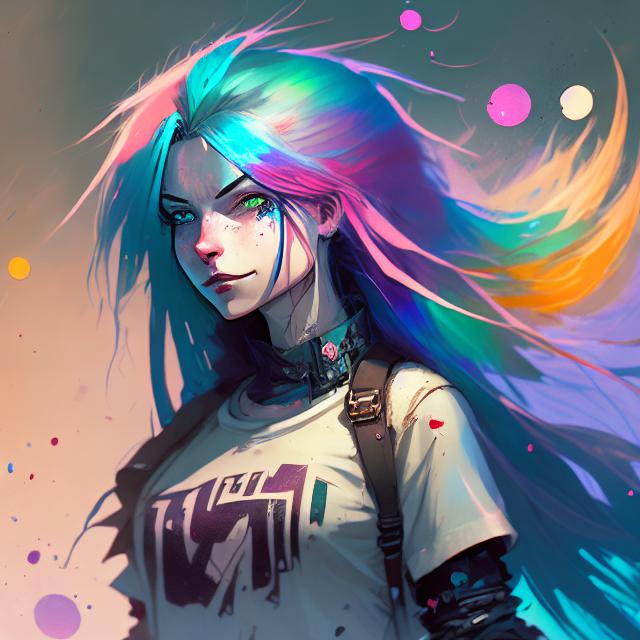
prompt = "a grungy woman with rainbow hair, travelling between dimensions, dynamic pose, happy, soft eyes and narrow chin, extreme bokeh, dainty figure, long hair straight down, torn kawaii shirt and baggy jeans, In style of by Jordan Grimmer and greg rutkowski, crisp lines and color, complex background, particles, lines, wind, concept art, sharp focus, vivid colors"

image = pipe(prompt).images[0]

image.show()

That’s the result! Pretty impressive, right? All we did was parsing a text prompt to the pipeline, and then the model analyzed the prompt and generated a corresponding image.
When crafting a prompt, it is very important to be detailed and specific so that you get a good result. Prompting will be the subject of a future tutorial.
Note, too, that when you run this code, you may get a slightly different image from the one in this tutorial because the AI randomly generates the images.
Let’s see another example:
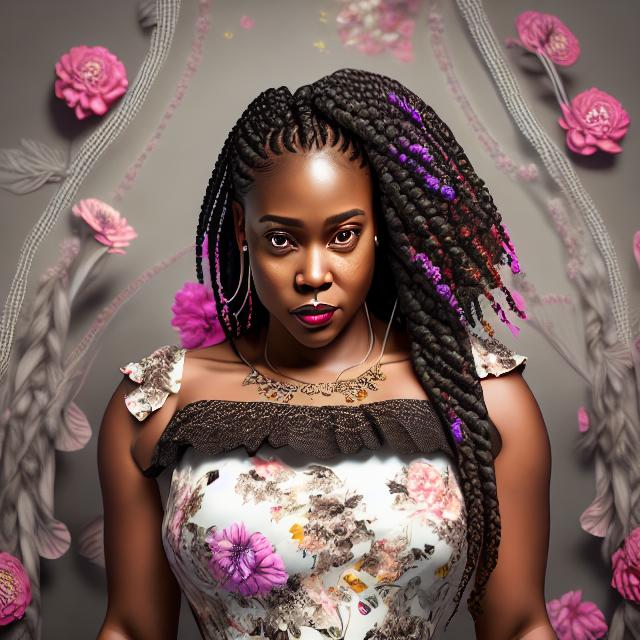
prompt = "a photo-realistic black woman with braided hair, dynamic pose, happy, soft brown eyes, extreme bokeh, curvy, floral patterned dress, In style of photo studio, white background, camera shot art, vivid colors, sharp focus"

image = pipe(prompt).images[0]

image.show()

Also not bad! The dreamlike-art/dreamlike-diffusion-1.0 text-to-image model did a pretty decent job generating images from a text prompt.
You can play around with the prompt to see how good the images it will generate will be.
Also, you can visit dreamlike.art to play with the web version of the application for free and create stunning original art.
Video, Further Resources & Summary
Do you need more explanations on how to create AI-generated art in Python? Then you should take a look at the following YouTube video of the Statistics Globe YouTube channel.
In the video, we explain in more detail how to create AI-generated art in Python.
The YouTube video will be added soon.
Furthermore, you could have a look at some of the other interesting AI-based tutorials on Statistics Globe:
- What is Image Classification?
- Image Classification Application Using Hugging Face transformers pipeline
- Introduction to Python Programming
In this tutorial, we have demonstrated how to create AI-generated art in Python in the Python programming language. I do hope you found this tutorial insightful and helpful! In case you have further questions, you may leave a comment below.
This page was created in collaboration with Ifeanyi Idiaye. You might check out Ifeanyi’s personal author page to read more about his academic background and the other articles he has written for the Statistics Globe website.


