How to Apply the ifelse Function without an else Output in R (4 Examples)
This tutorial explains how to avoid any else output when using the ifelse function in R programming.
The tutorial consists of the following content:
Let’s dive right into the examples.
Creating Example Data
We’ll use the following data as a basement for this R programming tutorial:
data <- data.frame(x1 = c(1, 3, 2, 4, 4, 1),
                   x2 = letters[1:6])
data
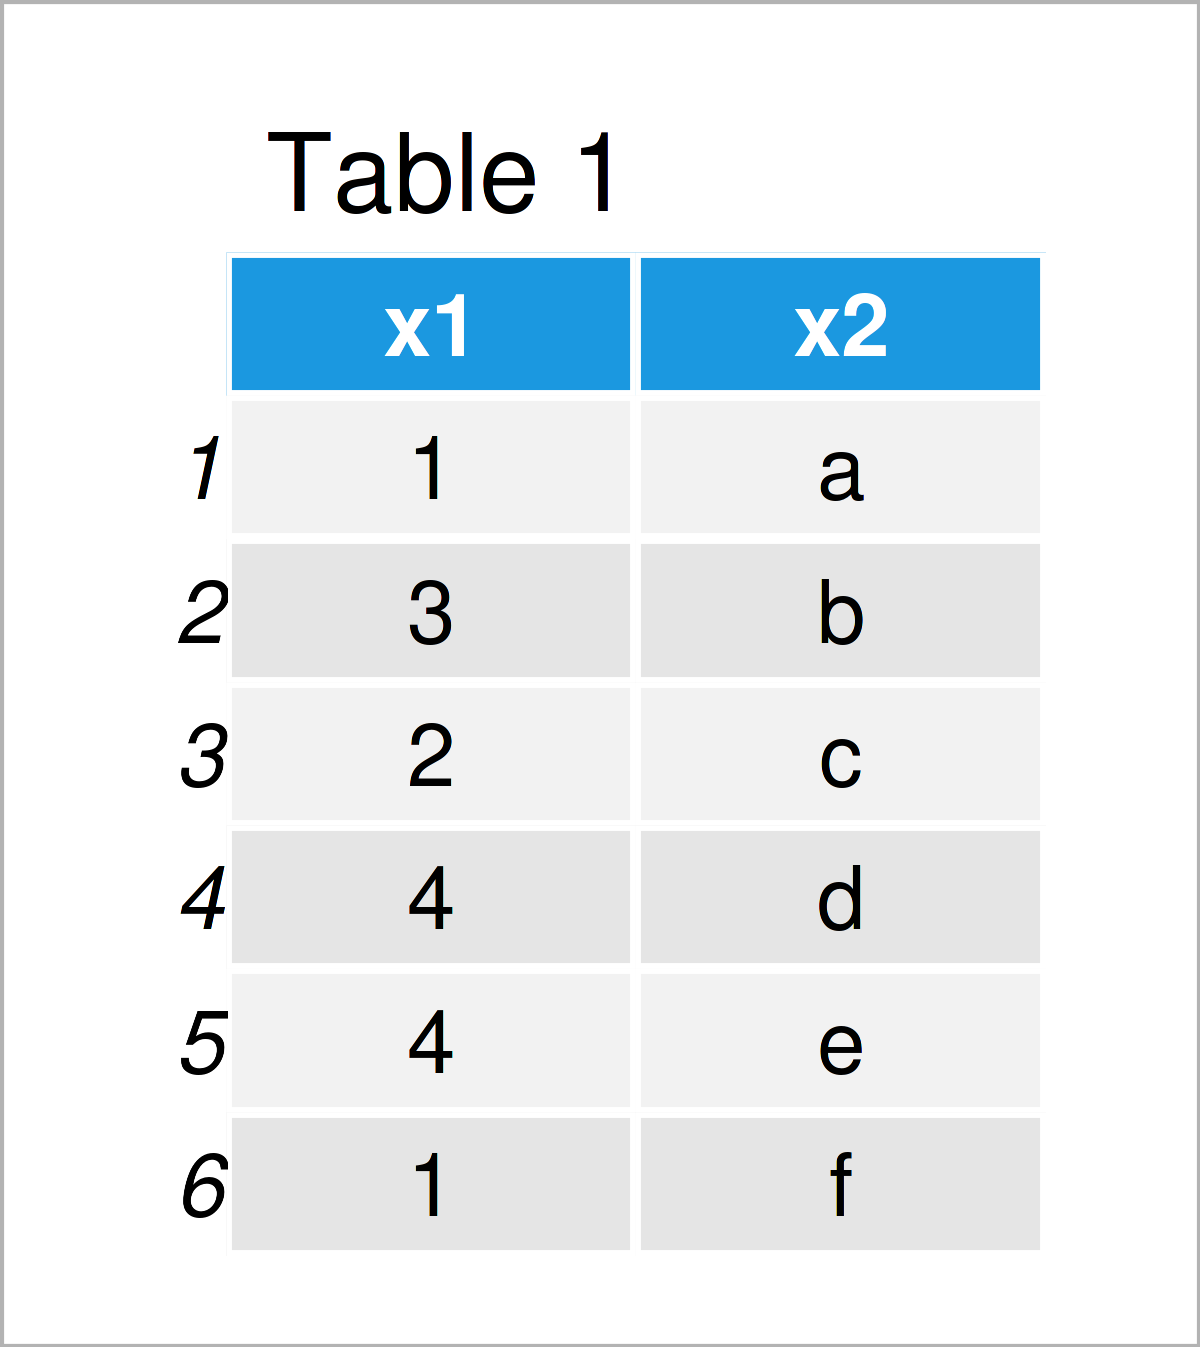
As you can see based on Table 1, our example data is a data frame consisting of six rows and two columns.
Example 1: Regular Application of ifelse() Function
This example shows the regular application of the ifelse function.
Let’s first create a duplicate of our example data frame, so that we can keep an original version of the input data:
data_new1 <- data # Duplicate data frame
Next, we can apply the ifelse function using a logical condition based on the column x1 of our data frame:
data_new1$x3 <- ifelse(test = data$x1 <= 2,       # Regular ifelse application
                       yes = "small",
                       no = "large")
Let’s have a look at the updated data:
data_new1 # Print updated data frame
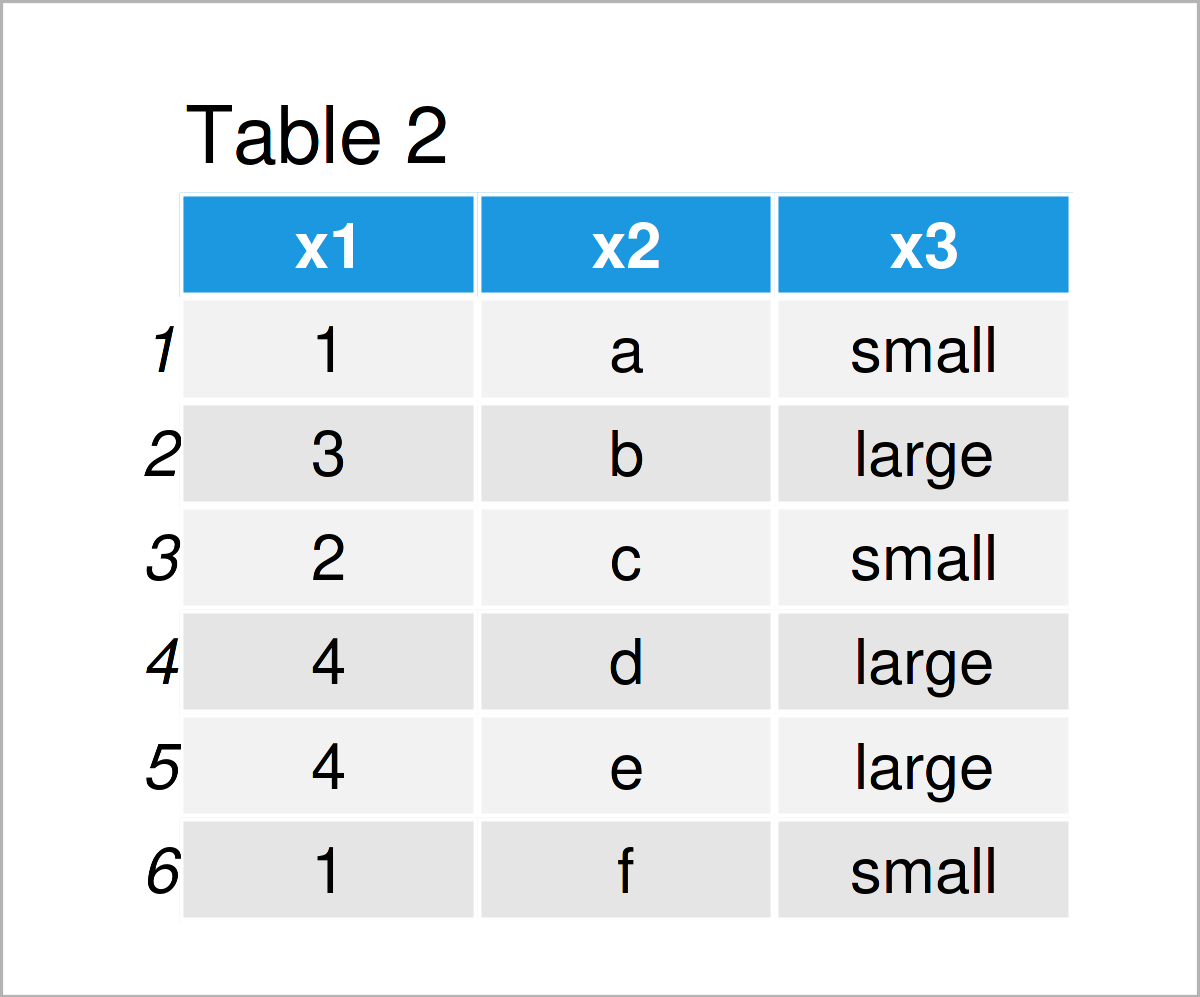
After executing the previous syntax the new data frame shown in Table 2 has been created. This data frame contains a third column called x3 that contains the character string “small” when the corresponding row value in the variable x1 is smaller or equal to 2, and the character string large, whenever the logical condition is FALSE.
Let’s avoid the else output when using the ifelse function!
Example 2: Only Change Value if ifelse() Condition is TRUE
The syntax below demonstrates how to keep the input value of an ifelse statement whenever the logical condition is not TRUE.
Once again, let’s duplicate our example data frame:
data_new2 <- data # Duplicate data frame
Next, we can use the ifelse function to create a new column. This column is set to “small” in case the logical condition is TRUE. However, in case the logical condition is FALSE, the value of the variable x1 is kept.
Consider the R code below:
data_new2$x3 <- ifelse(test = data_new2$x1 <= 2,  # Keep original values
                       yes = "small",
                       no = data_new2$x1)
Next, let’s have a look at the result:
data_new2 # Print updated data frame
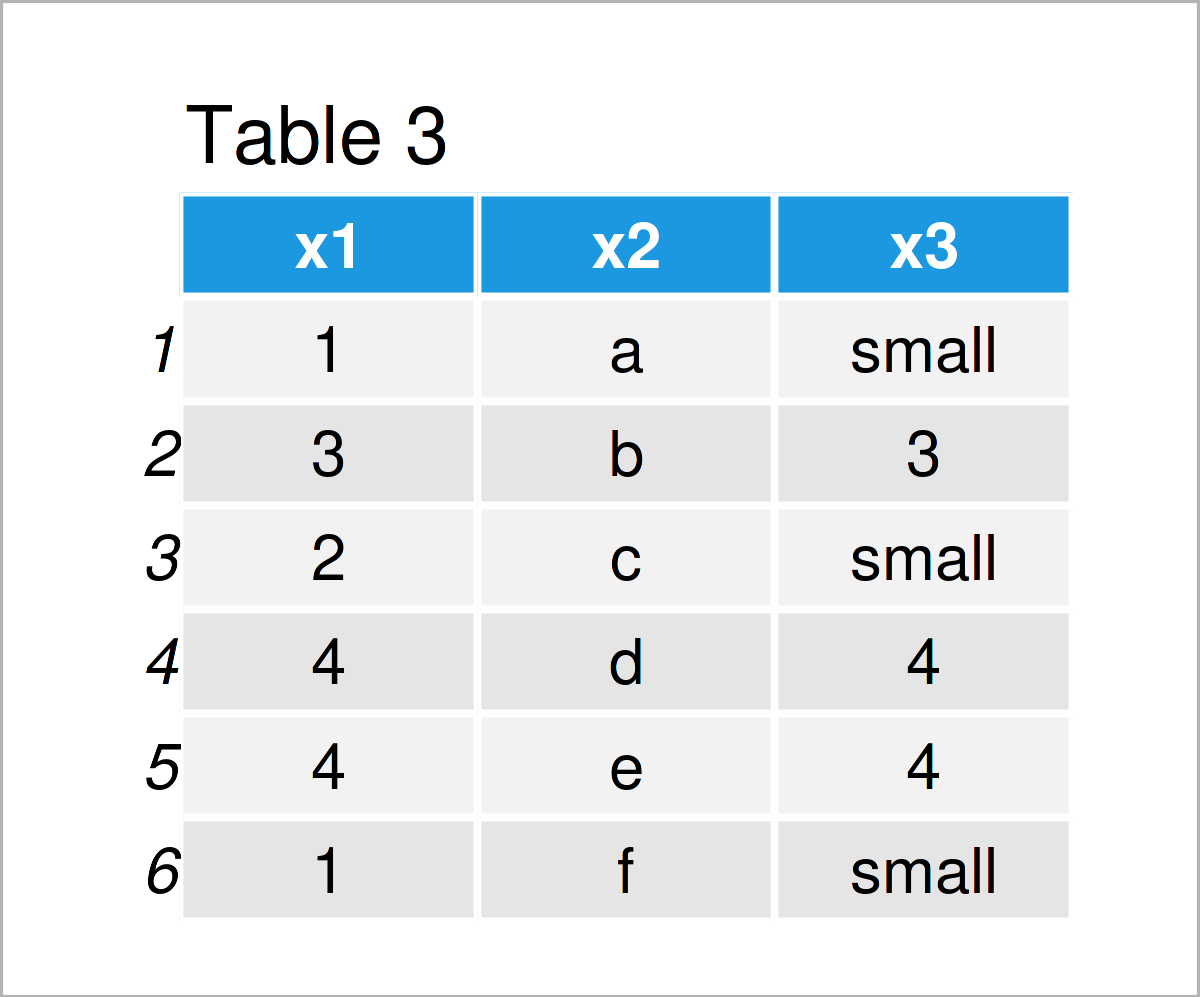
The output of the previous R programming syntax is shown in Table 3: We have added a new column called x3 which contains the character string “small” for the smaller values in x1, and the value of x1 in case of the larger values.
Example 3: Replace Values Conditionally without Using ifelse() Function
We can also create conditional outputs without even using the ifelse function. This example explains how to create a new variable conditionally.
First, let’s create a duplicate of our input data:
data_new3 <- data # Duplicate data frame
Next, we can create an empty column that contains only NA values:
data_new3$x3 <- NA # Create empty column
In the next step, we can replace all NA values by the character string “small” that follow a certain logical condition:
data_new3$x3[data_new3$x1 <= 2] <- "small" # Replace conditionally
Let’s display our data:
data_new3 # Print updated data frame
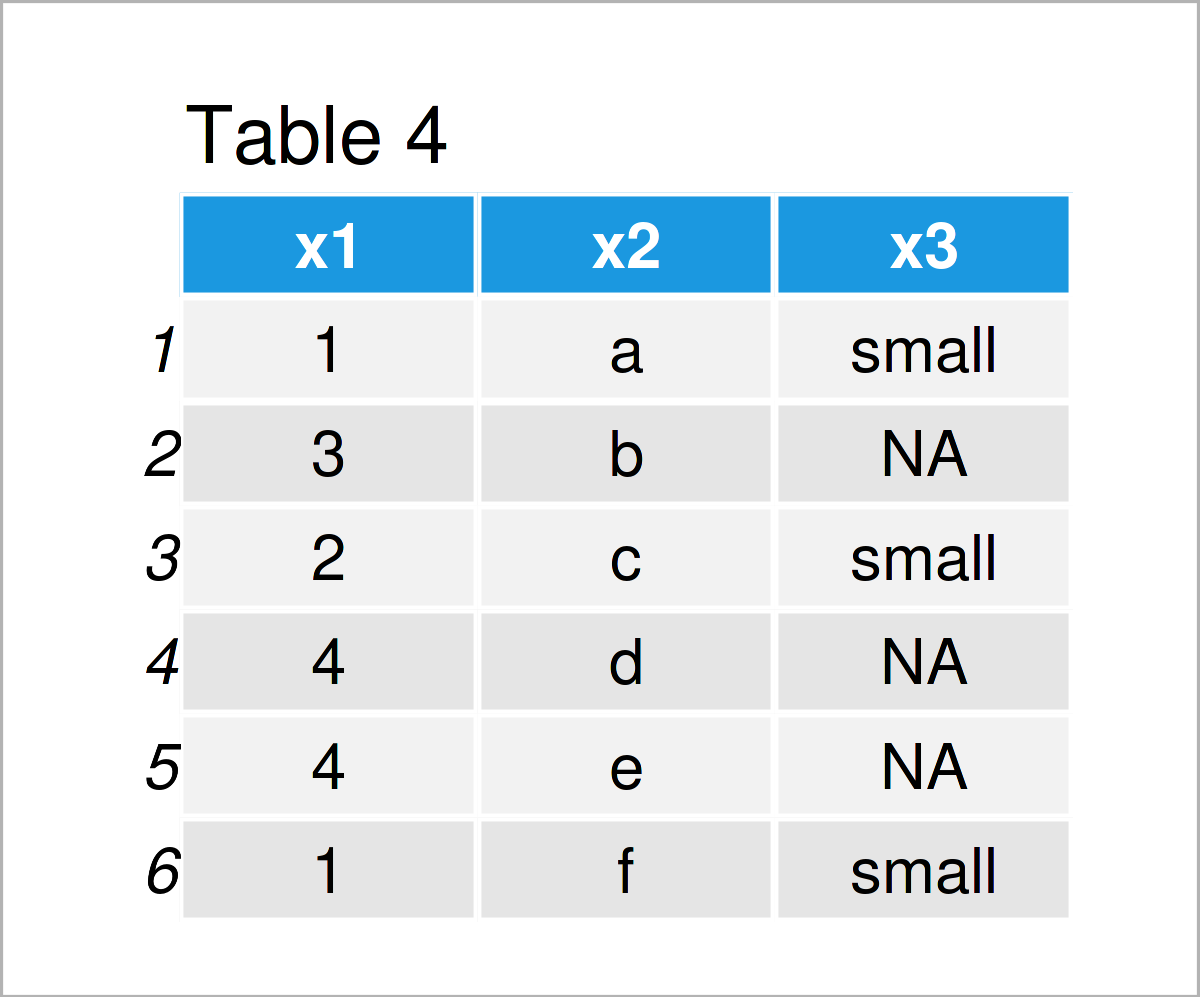
As you can see in Table 4, we have created another data frame by executing the previous R syntax. This time, we have not used the ifelse function to create a new data frame column.
Example 4: Replace Values Using for-Loop & if-Statement
In this example, I’ll show another alternative to the ifelse function. More precisely, we are using a for-loop and a nested if-statement.
Let’s duplicate our data:
data_new4 <- data # Duplicate data frame
As in Example 3, we also have to create an empty column:
data_new4$x3 <- NA # Create empty column
Now, we can iterate over the rows of our data frame using a for-loop and an if-statement:
for(i in 1:nrow(data_new4)) {                     # for-loop & if-statement
  if(data_new4$x1[i] <= 2) {
    data_new4$x3[i] <- "small"
  }
}
Have a look at our updated data frame:
data_new4 # Print updated data frame
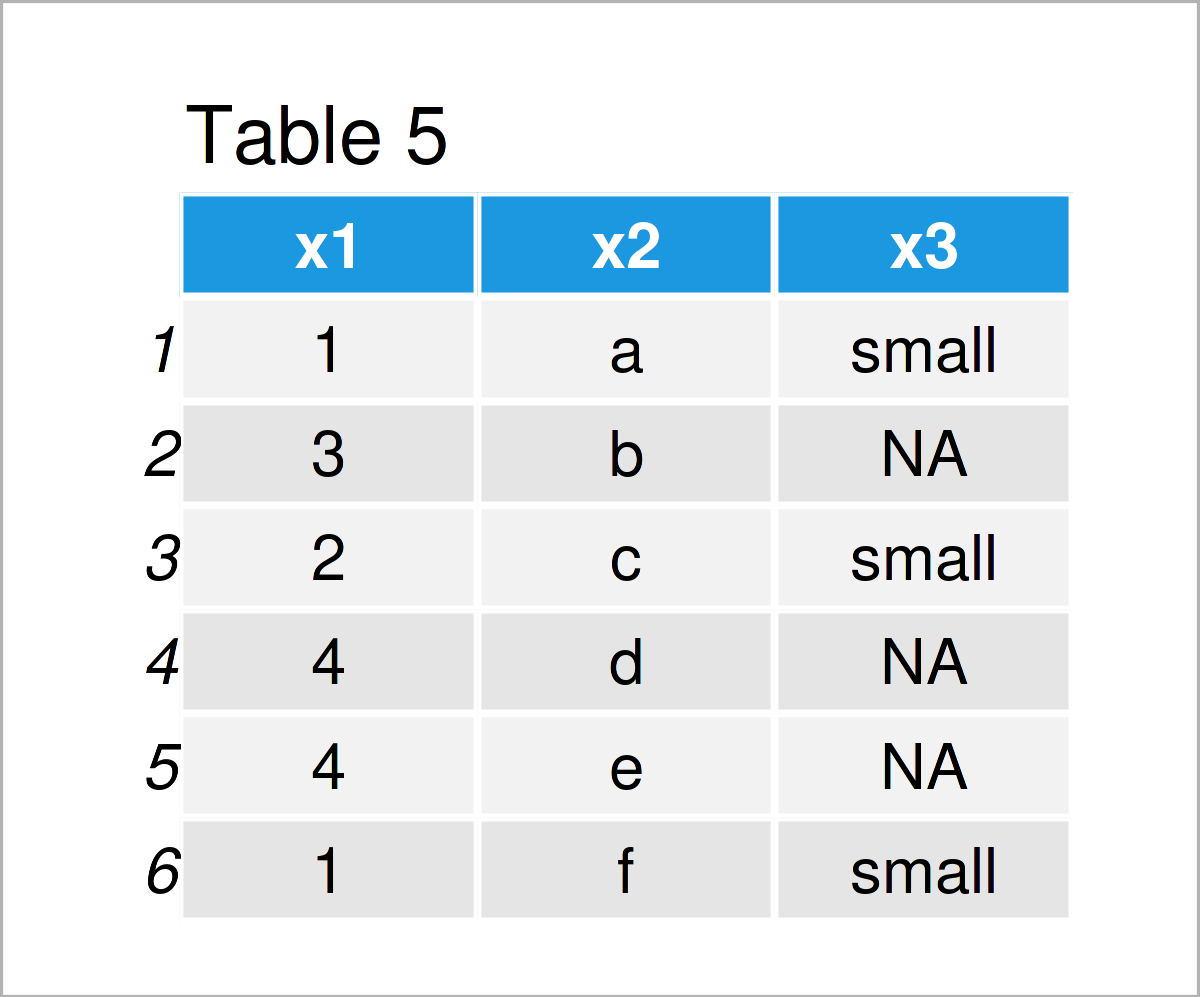
By running the previous R programming code, we have created Table 5, i.e. the same data frame output as in Example 3. However, this time we have used a loop and an if-statement to produce our result.
Video, Further Resources & Summary
I have recently released a video on the Statistics Globe YouTube channel, which shows the R programming syntax of this tutorial. Please find the video below:
The YouTube video will be added soon.
Additionally, you might read the related tutorials on this website.
- If Else Statement in R
- Nested ifelse Statement in R
- if_else R Function of dplyr Package
- R Commands List (Example Codes)
- Introduction to R
Summary: At this point you should have learned how to drop the else output when using the ifelse command in the R programming language. Please let me know in the comments section, in case you have any further questions. Furthermore, please subscribe to my email newsletter in order to get updates on the newest tutorials.


