Write xlsx & xls in R (4 Examples) | How to Export Data from R to Excel File
In this article, I’ll explain how to write Excel files in R. The tutorial will be based on the write.xlsx function of the xlsx package. So let’s first have a look at the basic R syntax and the definition of write.xlsx:
Basic R Syntax of write.xlsx:
require("xlsx")
write.xlsx(data, "data.xlsx")
Definition of write.xlsx:
The write.xlsx R function exports a data frame from R to an Excel workbook.
In the following tutorial, I’ll show you four examples for the application of write.xlsx in the R programming language.
Let’s dive right in!
Example 1: How to Write an xlsx File in R
In the first example, I’m going to show you the basic application of the write.xlsx function in R. Let’s first load an example data frame into R that we can use in the examples of this tutorial:
data(ToothGrowth)                                 # Load example data
head(ToothGrowth)                                 # First six rows of example data
#  len supp dose
#  4.2   VC  0.5
# 11.5   VC  0.5
#  7.3   VC  0.5
#  5.8   VC  0.5
#  6.4   VC  0.5
# 10.0   VC  0.5
With the previous R code we loaded the ToothGrowth into R.
In order to export this data set to an xlsx file, we need to install and load the xlsx package:
install.packages("xlsx")                          # Install xlsx package in R
library("xlsx")                                   # Load xlsx package in R
Now we can use the write.xlsx function of the xlsx package to save the ToothGrowth data matrix to an xlsx file:
write.xlsx(x = ToothGrowth,                       # Write xlsx in R
           file = "ToothGrowth.xlsx")
Run the previous code and the check the working directory that is currently used. You can find the current working directory with the following line of code:
getwd()                                           # Get current working directory
# "C:/Users/...Your Path..."
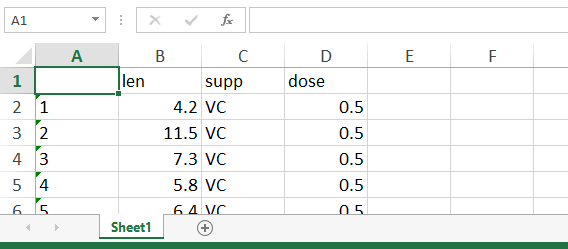
In this working directory, you should find a file which is called ToothGrowth.xlsx. The file looks as follows:

Table 1: Basic Excel Table Exported by write.xlsx.
That’s it! We just exported a simple xlsx file from R to our computer. However, the write.xlsx function provides many additional options and in the following examples I’m going to show you some of these options…
Example 2: Change Sheet Name of Excel File
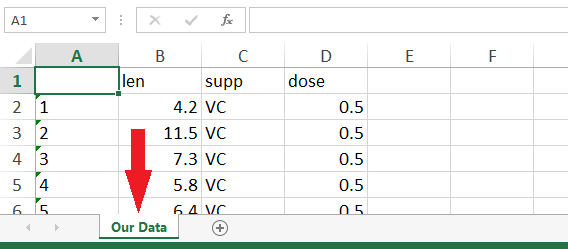
If we apply the write.xlsx command as in Example 1, the sheet name of our exported data will be Sheet1. However, it might be preferable to use a manual sheet name (especially if we want to append multiple sheets to our Excel file; as shown in Example 3).
With the following code, we can modify the sheet name of our Excel workbook:
write.xlsx(x = ToothGrowth,                       # Write xlsx with manual sheet name
           file = "ToothGrowth.xlsx",
           sheetName = "Our Data")

Table 2: Changed Sheet Name of Excel Table.
Example 3: Write Multiple Sheets to Excel File in R
If we want to append more sheets to our Excel file, we can specify append = TRUE within the write.xlsx R function. Have a look at the following code:
write.xlsx(x = ToothGrowth,                       # Write xlsx with multiple sheets
           file = "ToothGrowth.xlsx",
           sheetName = "Our Data Sheet 2",
           append = TRUE)

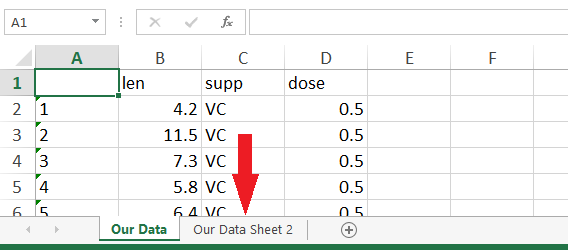
Table 3: Excel Workbook with Multiple Sheets.
With this code, we append the ToothGrowth data to an additional second sheet to the ToothGrowth.xlsx file, which we have created in Example 2. Of cause we could append as many sheets as we want. We just need to specify a different sheet name for each sheet that we want to append.
Example 4: Write xls in R
So far, we have only worked with xlsx files. However, depending on your operating system (e.g. Windows, Apple, Linux etc.) and depending on your specific needs, you might prefer to save your dataset as xls file.
Fortunately, this modification is quite easy based on the write.xlsx function. All you need to do is to change the filename extension from xlsx to xls:
write.xlsx(x = ToothGrowth,                       # Write xls in R
           file = "ToothGrowth.xls")
After running the previous code, you should find an xls file in your currently used folder.
Video: Alternatives to xlsx & xls
The R programming language provides many different ways for the exporting of our data. In fact, xlsx and xls files are much less common than other file formats such as csv.
In the following video of the MarinStatsLectures YouTube channel, you will find an extensive overview of different file extensions and how to export data from RStudio to these different file formats.
Have fun with the video and let me know in the comments in case you have further questions or feedback on the tutorial!
Further Reading
- Read Excel File in R
- Save & Load RData Workspace Files
- List of Useful R Functions
- The R Programming Language


6 Comments. Leave new
HI, amazing tutorial!!!
I always work on data comprising of Millions of rows and problem is how to get output of more than million rows in multiple workbooks
Regards
Hey Amit,
Thanks a lot for the very kind words!
When dealing with such huge data sets, I would probably use other file formats such as CSV or RData.
Regards
Joachim
Thanks for your response!!
You are very welcome Amit!
Bonjour,
L’ajout d’onglet supplémentaire dans un classeur excel ne fonctionne pas pour moi. C’est toujours le dernier enregistré qui est présent (il écrase systématiquement celui d’avant). J’ai pourtant fait très attention au code qui est le même sur tous les tuto… je ne comprends pas pourquoi la fonction write.xlsx ne fonctionne pas en multi-onglet alors que cela a l’air si pratique. Auriez-vous une explication ? par avance, merci.
Hey,
Could you please share the code you have used?
Regards,
Joachim